1.1. Why can't I save to my C drive? It's MY computer!!!
If you are using Windows 7, you will find some really great features. But, as one of our great founding fathers has said:
"Those who would sacrifice freedom for security deserve neither."
So, Microsoft has basically taken your freedom of being able to do what you feel with your computer and has now prevented you from saving files to certain areas of your computers.
Well, I say to hell with them. You let them know that you and your buddy Ben franklin will have nothing to do with this tyrannical nanny approach to computing. Show them what you're made of and
TURN THE UNIVERSAL ACCESS CONTROL COMPLETELY OFF AND REBOOT YOUR COMPUTER!
You know, in the Control Panel area. If you do this, then freedom can be yours once again. Sorry Billy G, ain't gonna play that game no more.
Sincerely,
The people that gave you your freedom back The great RJR Solutions
2. Spyware Removal
2.1. Security Monitor 2012
Remove Security Monitor 2012
This little issue can be cleaned up by using the most recent copy of MalwareBytes. Before doing that, you must first kill all the processes and disable it from starting up upon reboot. Most importantly, reboot the computer in SAFE MODE. This should disable the autorun on the malware and then install/update MalwareBytes (available here: http://www.malwarebytes.org/)
Since this removal process is fully documented online, please see the following URL for all the details:
We strongly advise you follow the link above for the source of the information on this issue and for any updates that may have been made to the process.
%Desktop% means that the file is located directly on your desktop. This is C:\DOCUMENTS AND SETTINGS\<Current User>\Desktop\ for Windows 2000/XP, and C:\Users\<Current User>\Desktop\ for Windows Vista and Windows 7.
%Temp% refers to the Windows Temp folder. By default, this is C:\Windows\Temp for Windows 95/98/ME, C:\DOCUMENTS AND SETTINGS\<Current User>\LOCAL SETTINGS\Temp for Windows 2000/XP, and C:\Users\<Current User>\AppData\Local\Temp for Windows Vista and Windows 7.
%AppData% refers to the current users Application Data folder. By default, this is C:\Documents and Settings\<Current User>\Application Data for Windows 2000/XP. For Windows Vista and Windows 7 it is C:\Users\<Current User>\AppData\Roaming.
%StartMenu% refers to the Windows Start Menu. For Windows 95/98/ME it refers to C:\windows\start menu\, for Windows XP, Vista, NT, 2000 and 2003 it refers to C:\Documents and Settings\<Current User>\Start Menu\, and for Windows Vista/7 it is C:\Users\<Current User>\AppData\Roaming\Microsoft\Windows\Start Menu.
Associated Security Monitor 2012 Windows Registry Information:
This should remove the program from your system but you probably still have a warning message displayed as your wallpaper in Windows and the virus removed the ability to change the wallpaper or your desktop settings.
To restore ability to change your desktop settings and select a different wallpaper and screen saver do the following:
Start, run
type Gpedit.msc
Navigate to User configuration, Administrative Templates, Control Panel, Display
Right click on Remove Display in Control Panel
Click on Properties and select Disabled
Do the same steps to change the following attributes to disabled:
Hide Desktop Tab
Prevent changing wallpaper
Hide Apperance and Themes tab
Hide Settings tab
Hide Screen Saver tab
You should now be able to use your computer normally and change the wallpaper to something other than the warning message Antivirus XP 2008 set it to.
If the above does not allow you to get the desktop back, then try the following:
Once you have the virus deleted you will notice you are missing the Screensaver and Background Wallpaper TABS in Display Properties. This will prevent you from removing that annoying message or the modified Wallpaper. Here is how you get the TABS back to be able to get rid of the message or stupid Wallpaper:
Manual Steps Using Windows XP Registry…….. be careful
Click Start and then Run.
Type regedit in the Run dialog box & Click OK.
Navigate to: HKEY_CURRENT_USER\Software\Microsoft\Windows\CurrentVersion\Policies\System
Right-click NoDispScrSavPage to select Modify and Change the value to 0.
Do exactly the same with the NoDispBackgroundPage entry
Go out of the Registry and Restart your Computer
*************************************
In Addition this Viral Abomination also goes and disables your System Restore Options
Here are Instructions to correct this:
Go to the System Registry (Start Run, type in: regedit and click OK)
Highlight My Computer, then under Edit in the File Menu select Find
Type RestoreOpenIsSafe and click on Find Next
At the Fist Instance of the Entry, Right-Click on it and select Modify………. change the value to 1 (if it is not 1 already, Click OK, then press the F3 Button to search for more of the same Entry
At the 2nd Instance of the Entry, do the same
There should only be 2 Instances of the Entry but to make sure that you press F3 again and modify any additional Instances of the Entry until you are through the Registry.
Go out of the Registry and Restart your computer.
Now your Restore Systems should work again.
============================================
IF THE ABOVE DOES NOT WORK, THEN FOLLOW THIS:
1. Download Malwarebytes’ Anti-Malware (mbam-setup.exe) and save it on your Desktop. 2. After downloading, double-click on mbam-setup.exe to install the application. 3. Follow the prompts and install as “default” only 4. Before the installation completes, check on the following prompts: - Update Malwarebytes’ Anti-Malware - Launch Malwarebytes’ Anti-Malware 5. Click “Finish.” Program will run automatically and you will be prompt to update the program before doing a scan. Please update. 6. Scan your computer thoroughly. 7. When scanning is finished click on the “Show Results” 8. Make sure that all detected threats are marked, click on Remove Selected. 9. Restart your computer.
Antivirus 2009 or Antivirus2009, is a rogue antispyware application that created to ruin the integrity of our computing experience. Antivirus 2009 is fake and malicious, with the intent of screwing up your computers. Antivirus 2009 is a clone of the infamous Antivirus 2008. It is somewhat ironic to see a fake antivirus application got upgraded. Guess we are living in an usual world and nothing really surprises us anymore. Generally, Antivirus 2009 usually comes up after you installed a video codec that come with Trojan, malware and virus. Antivirus 2009 normally generates fake and misleading system popup error messages so end-users will be tricked into purchase Antivirus 2009.
It is extremely important to remove all the components of of the Antivirus 2009 and all the malware and trojans that it might have come bundle with (such as zlob.trojan, trojan.vundo and Trojan.Downloader). To effectively and safely remove Antivirus 2009, we have created a manual removal instructions. Be sure to back the data up before proceeding. Good luck!
2.4. Remove afinding.exe and/or wserving.exe (computer randomly plays audio)
If computer randomly plays audio ads, it is likely infected with Afinding.exe, Wserving.exe or both. Boot into safe mode and remove the follwing binaries:
afinding.exe perfs.exe routing.exe wserving.exe
Delete the corresponding service for each of the above files with the following command:
sc delete [servicename]
3. Connectivity
3.1. Understanding DNS
Understanding DNS (Domain Name System)
DNS stands for Domain Name System. Whether you realize it or not, you use the DNS every time you use the Internet.
Think of the DNS as the phonebook of the Internet. You know websites by their URL (ex: www.example.com). The Internet only knows websites by their numerical address (ex: 127.0.0.1). When you type a URL into your browser and hit the Enter button on your keyboard, your computer automatically uses the DNS to look up its numerical address and get you to the site you are trying to visit.
The Internet simply wouldn't work without the DNS. For most of us, remembering a numerical address for every website we visit would be hard. (Think about the challenge remembering a seven-digit phone number often presents if you don't write it down.) Because of the DNS, you don't have to remember the numerical address of websites.
3.2. Using OpenDNS for XP
USING OpenDNS: Windows XP
Overview
Select Control Panel from the Start menu.
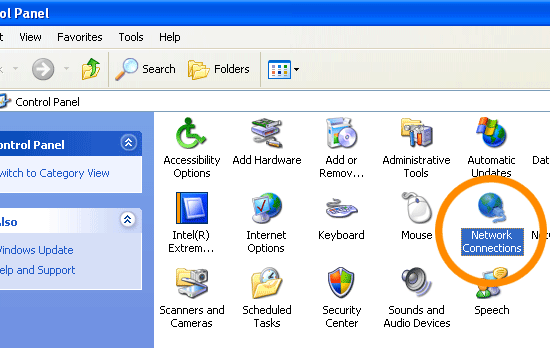
Click Network Connections from the Control Panel choices.
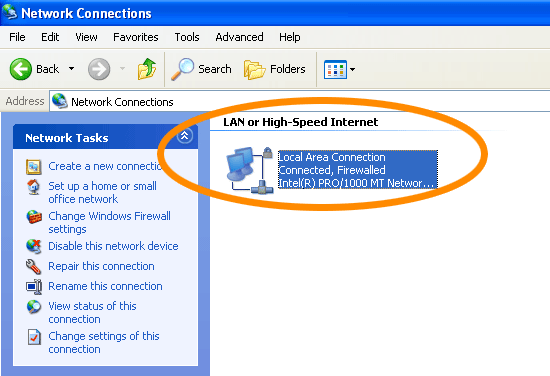
Choose your connection from the Network Connections window.
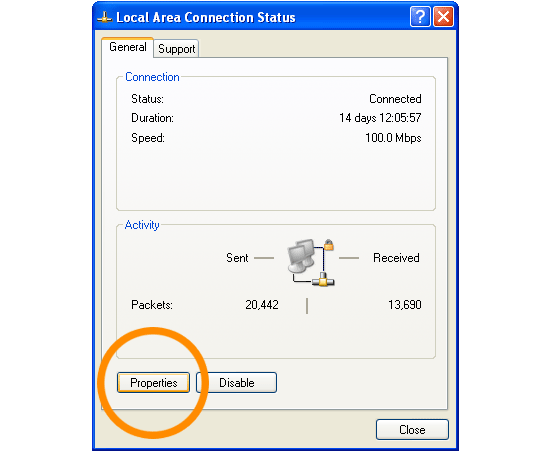
Click Properties button.
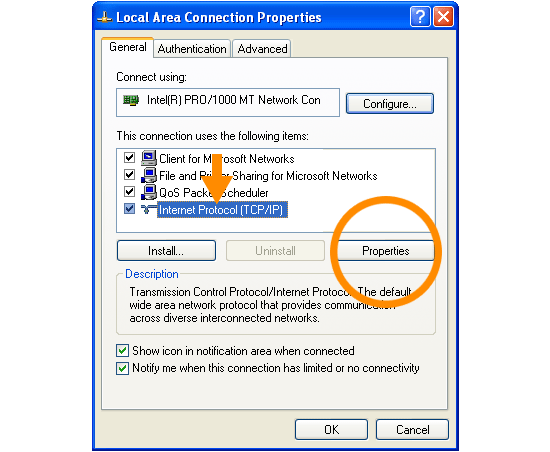
Select Internet Protocol (TCP/IP) and click Properties.
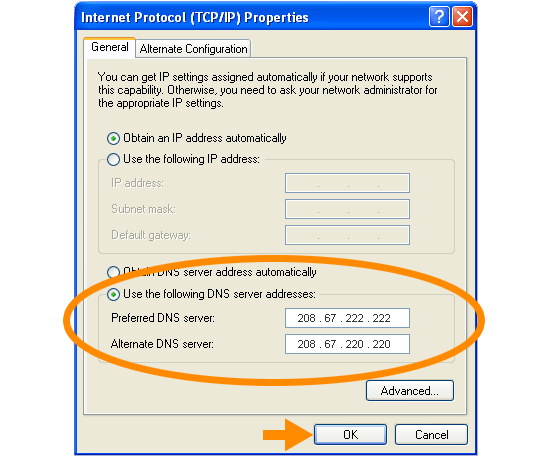
Click the radio button Use the following DNS server addresses and type in OpenDNS addresses in the Preferred DNS server and Alternate DNS server fields.
1. Select Control Panel from the Start menu.
2. Click Network Connections from the Control Panel choices.
3. Choose your connection from the Network Connections window.
In this screenshot, Local Area Connection is the only choice. If you have more than one, choose your default/current connection.
4. Click Properties button.
5. Select Internet Protocol (TCP/IP) and click Properties.
6. Click the radio button Use the following DNS server addresses and type in OpenDNS addresses in the Preferred DNS server and Alternate DNS server fields.
Please write down your current DNS settings before switching to OpenDNS, in case you want to return to your old settings for any reason.
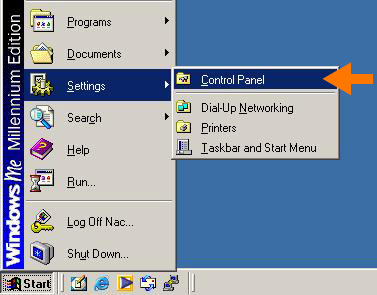
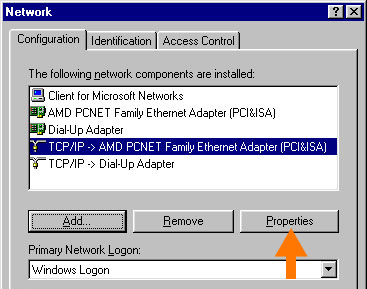
1. From the Start menu, select Settings, then Control Panel.
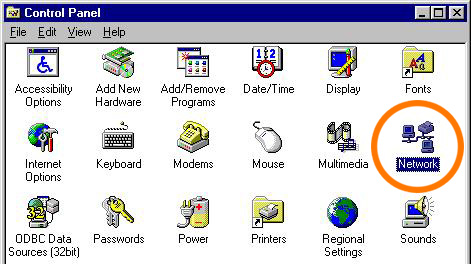
2. Click on Network.
3. Under the Configuration tab, select the TCP/IP listing that has an arrow pointing to your Ethernet adapter, then click the Properties button.
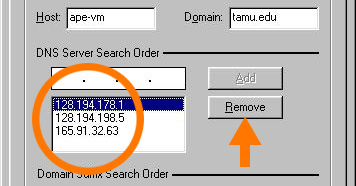
4. Under the DNS Configuration tab, Remove all existing DNS servers from your configuration.
Please write down your current DNS settings before switching to OpenDNS, in case you want to return to your old settings for any reason.
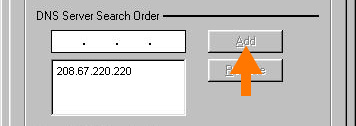
5. Add both OpenDNS addresses, one at a time.
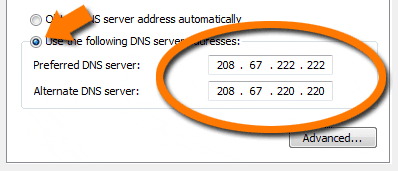
OpenDNS addresses:
208.67.222.222
208.67.220.220
6. Click OK to save your changes.
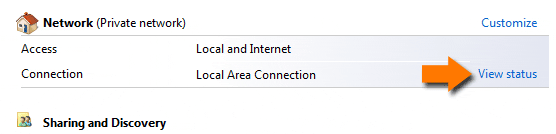
3.4. Using OpenDNS for Vista
Enable OpenDNS: Windows Vista
Overview
Click the Start Orb, then select Control Panel.
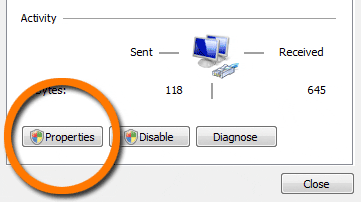
Click on View network status and tasks.
Click on View status.
Click the Properties button.
Vista may ask for your permission to make changes. If so, click the Continue button.
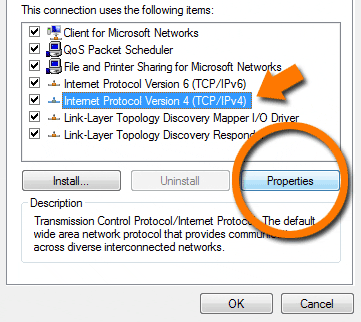
Select Internet Protocol Version 4 (TCP/IPv4), then click the Properties button.
Click the radio button Use the following DNS server addresses: and type in OpenDNS addresses in the Preferred DNS server and Alternate DNS server fields.
Click the OK button, then the Close button, and the Close button again. Close the Network and Sharing Center window.
1. Click the Start Orb, then select Control Panel.
2. Click on View network status and tasks.
3. Click on View status.
4. Click the Properties button.
5. Vista may ask for your permission to make changes. If so, click the Continue button.
6. Select Internet Protocol Version 4 (TCP/IPv4), then click the Properties button.
7. Click the radio button Use the following DNS server addresses: and type in OpenDNS addresses in the Preferred DNS server and Alternate DNS server fields.
8. Click the OK button, then the Close button, and the Close button again. Close the Network and Sharing Center window.
This document provides step-by-step instructions for moving each of the data folders for Windows Small Business Server 2003. The data folders include the Users Shared Folders, SharePoint and Monitoring databases, Exchange databases and log files, Sent Faxes folder, and ClientApps shared folder. You can use the instructions in this document to move one or all of the data folders.
Objective Overview of Moving Data Folders Complete and Verify a Full Backup Notify Users that Resources will be Unavailable Move the Users Shared Folders Move the SharePoint Databases Move the Monitoring Databases Move Exchange Databases and Log Files Move the Sent Faxes Folder Move the ClientApps Shared Folder Complete the Moving of Data Folders Related Links
4.2. Reclaim Disk Space on C
The following is information taken from http://www.eggheadcafe.com/
SBS W2K3 Changing Page File location - Failure0xC3EC78BCPoolalreadyexist
05-Dec-07 11:13:01
Hi Larry,

The only problem is that the Page File on C drive is still 1.5gb (even after
i setup C drive to No Paging file option).

BTW, I already moved few unused folders, as well as the Windows updates
uninstall folders.

Barry
SBS W2K3 Changing Page File location - bar.levkovit
06-Dec-07 02:24:45
Hi

I hope someone can clear the following issue.


I have a SBS W2K3 running SP1.
Before upgrading to SP2 i wanted to claim more space of my C drive,
so I  changed the Page File location to D Drive and setup C drive
option to NO Page File option.
After restart I have 2 Page File on both Drives. The Page File on C
drive still exists.


Do I need to manually delete to file from C drive ??


Please advise.


Thanks,


Barry L.
SBS W2K3 Changing Page File location - v-robel
07-Dec-07 01:39:12
Hi Barry,
Thanks for posting in our newsgroup and also for Larry's input.
You can delete the unused page file on drive C. To get more free disk place on driver C:, you can move the Exchange mailbox, SharePoint, Monitoring database, ClientApps Shared Folder and users share folder to the other partition. For the detail steps, please refer to the following white paper.
Moving Data Folders for Windows Small Business Server 2003 http://www.microsoft.com/technet/prodtechnol/sbs/2003/maintain/movedata.mspx
I noticed you moved Windows Update related folders. If you have WSUS on SBS, you can take the following steps:
Step 1: For the unneeded WSUS updates, you can try a free tool, WsusDebugTool.exe to remove unneeded contents in WSUS server.
1. You can download it from the following web site:
2. Double click WSUS Server Debug Tool.EXE file to extract WsusDebugTool.exe file to a folder. 3. Running the command "WsusDebugTool.exe /Tool:PurgeUnneededFiles"
Step 2: You can also move the location of local WSUS update storage using WSUSutil.exe, a command-line tool that is copied to the file system of the WSUS server during WSUS Setup.
where D:\WSUS is the new path for local WSUS update storage, and D:\move.log is the path to the log file.
For more information about WSUSutil.exe, see
Specifying Where to Store Updates http://www.microsoft.com/technet/prodtechnol/windowsserver2003/library/WSUS/ WSUSOperationsGuideTC/8cca6fab-163e-451d-ab78-70b39fdb1455.mspx
Hope this helps.
If you need further assistance, please don't hesitate to let me know.
This newsgroup only focuses on SBS technical issues. If you have issues regarding other Microsoft products, you'd better post in the corresponding newsgroups so that they can be resolved in an efficient and timely manner. You can locate the newsgroup here: http://www.microsoft.com/communities/newsgroups/en-us/default.aspx
When opening a new thread via the web interface, we recommend you check the any updates in your thread. When responding to posts via your newsreader, please "Reply to Group" so that others may learn and benefit from your issue.
Microsoft engineers can only focus on one issue per thread. Although we provide other information for your reference, we recommend you post different incidents in different threads to keep the thread clean. In doing so, it will ensure your issues are resolved in a timely manner.
For urgent issues, you may want to contact Microsoft CSS directly. Please check http://support.microsoft.com for regional support phone numbers.
Any input or comments in this thread are highly appreciated.
This posting is provided "AS IS" with no warranties, and confers no rights.
-------------------- after small, 2 you
SBS W2K3 Changing Page File location - Failure0xC3EC78BCPoolalreadyexist
13-Dec-07 02:58:00
Thanks for the info.
Problem is solved.

Barry
SBS W2K3 Changing Page File location - v-robel
14-Dec-07 05:32:17
Hi,
Thanks for your reply.
I am glad to know the information is helpful.
I'd like to make a summary for this post.
Q: After changing the virtual memory for disk C to D, can I delete c:\pagefile.sys file?
A: Yes, you can delete the unused page file on drive C. In addition, you can take the steps in following articles to get more space on drive C.
Moving Data Folders for Windows Small Business Server 2003 http://www.microsoft.com/technet/prodtechnol/sbs/2003/maintain/movedata.mspx
For future postings, I would like to list the following information as a guideline when submitting new posts in the future. This information will help us to understand the issue and situation more quickly. Thank you!
1. Has the server/client/product ever worked? 2. If so, what changed? 3. What service packs and updates were applied? 4. What are the steps to reproduce the problem? 5. Does it happen the same way on any other systems? 6. Please provide the exact error message with any screenshots, if possible.
If you need any assistance in the future, please feel free to post in our newsgroup.
This newsgroup only focuses on SBS technical issues. If you have issues regarding other Microsoft products, you'd better post in the corresponding newsgroups so that they can be resolved in an efficient and timely manner. You can locate the newsgroup here: http://www.microsoft.com/communities/newsgroups/en-us/default.aspx
When opening a new thread via the web interface, we recommend you check the any updates in your thread. When responding to posts via your newsreader, please "Reply to Group" so that others may learn and benefit from your issue.
Microsoft engineers can only focus on one issue per thread. Although we provide other information for your reference, we recommend you post different incidents in different threads to keep the thread clean. In doing so, it will ensure your issues are resolved in a timely manner.
For urgent issues, you may want to contact Microsoft CSS directly. Please check http://support.microsoft.com for regional support phone numbers.
Any input or comments in this thread are highly appreciated.
This article was previously published under Q211494
SYMPTOMS
When you double-click a Microsoft Excel workbook (.xls file or .xlsx file) in Microsoft Windows Explorer, Excel does not open the file, and you may receive the following error message:
Cannot find the file 'path' (or one of its components). Make sure the path and filename are correct and that all required libraries are available.
In Window Vista, when you double-click an Excel workbook, Excel does not open the file, and you may receive the following error message:
Windows cannot find 'FilePath\FileName', Make sure you typed the name correctly, and then try again.
Excel may actually open, but the file will not open. If Excel is already running, a second instance of Excel may start.
When you double-click an Excel workbook in Windows Explorer, a dynamic data exchange (DDE) message is sent to Excel, instructing it to open the workbook that you double-clicked.
If the Ignore other applications setting is selected, Excel ignores DDE messages sent to it by other programs. As a result, the DDE message sent to Excel by Windows Explorer is ignored, and Excel does not open the workbook that you double-clicked.
6. General Information
6.1. REMOVE Windows Genuine Validation
REMOVE Windows Genuine Validation
Open Windows Explorer by clicking Start -> All Programs -> Accessories -> Windows Explorer.
Browse to C:\Documents and Settings\All Users\Application Data\Windows Genuine Advantage\data folder.
Delete (or backup or move to another folder, if you want) data.dat file.
Create a new empty data.dat: You can create a new text file by (make sure you are at the right folder at above) clicking File -> New -> Text Document or right clicking on Windows Explorer window then click New -> Text Document. Then, either rename the file to data.dat. The original .txt extention of the text file need to be changed too. You can disable the hiding of extension of known file types, or follow the following steps to create a new file out of the text file:
Open the text document you just created.
Click on File -> Save As.
Change the Save as type to "All Files".
In the File name, type data.dat
Click Save.
Go back to the Windows Explorer, at folder C:\Documents and Settings\All Users\Application Data\Windows Genuine Advantage\data, check that data.dat exists.
Delete the text file you created previously.
Set the attributes of data.dat to Hidden and Read-Only. Attributes can be set by right click on the data.dat file, and then click on Properties.
Windows Genuine Advantage (WGA) validation check has been disabled.
6.2. How to change the RDP listening port
How to change the listening port for Remote Desktop
This article was previously published under Q306759
INTRODUCTION
This article describes how to change the port that Remote Desktop listens on.
Note The Remote Desktop Connection Client for the Mac supports only port 3389. 3389 is the default port.
MORE INFORMATION
You can use the Remote Desktop feature in Microsoft Windows XP Professional to connect to your computer from another remote computer.
Warning The Remote Assistance feature in Microsoft Windows XP may not work correctly if you change the listening port.
For additional information, click the following article number to view the article in the Microsoft Knowledge Base:
307711 (http://support.microsoft.com/kb/307711/) Remote Assistance invitation file does not contain correct port number
To change the port that Remote Desktop listens on, follow these steps.
Important This section, method, or task contains steps that tell you how to modify the registry. However, serious problems might occur if you modify the registry incorrectly. Therefore, make sure that you follow these steps carefully. For added protection, back up the registry before you modify it. Then, you can restore the registry if a problem occurs. For more information about how to back up and restore the registry, click the following article number to view the article in the Microsoft Knowledge Base:
322756 (http://support.microsoft.com/kb/322756/) How to back up and restore the registry in Windows
1.
Start Registry Editor.
2.
Locate and then click the following registry subkey:
On the Edit menu, click Modify, and then click Decimal.
4.
Type the new port number, and then click OK.
5.
Quit Registry Editor.
Note When you try to connect to this computer by using the Remote Desktop connection, you must type the new port.
304304 (http://support.microsoft.com/kb/304304/) How to configure the Remote Desktop client to connect to a specific port when you use Windows XP
6.3. Cleanup the MSCONFIG startup tab listings in Windows XP and Windows Vista
Introduction
MSCONFIG (System Configuration Utility) is a frequently used tool to manage the startup applications. This utility, however does not have an option to delete the entries. The entry which you've unchecked a long time back may still show up, while the application may have been uninstalled already. To remove the invalid entries in the System Configuration utility, you need to edit the registry or use a third-party utility.
Locations of the entries in MSConfig
The enabled/checked items are populated from the following registry locations:
HKEY_LOCAL_MACHINE \ Software \ Microsoft \ Windows \ CurrentVersion \ Run HKEY_CURRENT_USER \ Software \ Microsoft \ Windows \ CurrentVersion \ Run
-and-
HKEY_CURRENT_USER \ Software \ Microsoft \ Windows NT \ CurrentVersion \ Windows Values named Run & Load
The disabled entries are present in these locations:
To remove the entries, start the Registry Editor (regedit.exe) and navigate to the above paths. Backup the key before deleting it.
Disabled items are stored as a per-machine basis (HKLM?).
Yes. The hkey string value stores the location where the entry was originally. Say, when the user re-checks the entry, the hkey value determines whether to place the entry back to HKCU or HKLM.
6.4. How to Write ISO Images to CD
How can I write (burn) ISO files to CD?
ISO files are actually images of complete CDs compiles as one whole image, just like Ghost does for hard disks and partitions. ISO images can be loaded into several different CD recording software packages to create CDs.
ISO Recorder Power Toy (Freeware)
ISO Recorder is a Windows XP freeware utility that uses native Windows XP functions to write images to a CD. You can download this utility from the author’s Web page. When the program is installed, it is automatically associated with the ISO file extension in Windows Explorer.
Steps to create a CD if you have installed ISO Recorder Power Toy:
Download the ISO CD image to a folder on your computer.
Insert a blank CD in your CD-RW drive.
Start Windows Explorer.
Locate the ISO file, right-click the file name, and then click Copy image to CD to open the ISO Recorder Wizard.
Follow the steps in the wizard to write the image to the CD.
Another alternate method:
You can also right-click your CD-R drive and choose Copy Image to CD.
In the new window browse to the ISO file and click Next.
Reader comment: Reader Ori Artman adds his small useful tip:
"Small and maybe valuable tip for the ‘How can I write ISO files to CD?’ tip. This power tool works only on files with ISO extension. There’re some ISO files with IMG extension (notably MSDN’s distribution files). Change the extension to .ISO and this power tool will work as advertised. There maybe other file formats that are ISO format and are called something else…"
Thanks!
Nero - Burning ROM (Ahead Software)
You can use Nero Burning ROM to record a CD from an ISO file. You must purchase this program from Ahead Software. For more information about this program, visit the Ahead Software Web site at: http://www.nero.com
Steps to create a CD if you have installed Nero - Burning ROM:
Download the ISO CD image to a folder on your computer.
Insert a blank CD in your CD-RW drive.
Start Nero Burning.
Follow the wizard steps to select Data CD creation.
When the wizard closes, click Burn Image on the File menu.
In the Open dialog box, select the ISO file, and then click Open.
In the wizard, click Burn to write the image to the CD.
EasyCD Creator (Roxio)
You can use EasyCD Creator to create a CD from an ISO file. You must purchase this program from Roxio. When the program is installed, it is automatically associated with the ISO file extension in Windows Explorer. For more information about this program, visit the Roxio Web site at: http://www.roxio.com
Steps to create a CD if you have installed EasyCD Creator:
Download the ISO CD image to a folder on your computer.
Insert a blank CD in your CD-RW drive.
Start Windows Explorer.
Locate the ISO file, right-click the file name, and then click Open to start EasyCD.
In the Write Method section of the CD Creation Setup dialog box, click Disk at Once for optimum recording performance.
Click OK to write the image to the CD.
CDBurn.exe from the XP Support Tools
You can use CDBurn.exe that is included in the Windows Server 2003 Support Tools (read Download Windows 2003 Reskit Tools for more info).
ISO CD-ROM Burner Tool (CDBurn) is a command-line tool that allows the user to write (burn) data images from image files located on the hard drive to compact disc (CD) recordable (CD-R) and CD rewritable (CD-RW) media. The data image can be any kind of data, even raw data. This tool can also be used to erase CD-RW media.
Example: Burn a CD From an Image File When a Drive Letter is Assigned to the CD Burner. Type the following at the command line:
Press ENTER. Output similar to the following is displayed:
Number of blocks in ISO image is 3d1d6 | 25.6% done / 45.2% done / 55.3% done - 68.9% done \ 89.3% done - 100.0% done Finished Writing Synchronizing Cache: burn successful!
Notes: The drive letter assigned to the burner in this example is D and the image file being written is located at c:\dotnet_usa_3678.IDS_x86fre_srv.iso
The default burn speed for this tool is 4x. The maximum burn speed is limited by the maximum speed of the burner. Use the speed parameter to set the burn speed. The max parameter sets the burn speed of the CD burner to maximum.
Summary
This article has discussed several methods for burning iso files to different media types, including free iso burners and some commercial iso writers. The .iso burned copies are often used to duplicate entire CD/DVD's in their original file structure without having to worry about individual files.
6.5. How to use ISO Image files with VMware
How to use ISO Image files with VMware
VMware Workstation, Server, and ESX Server can use virtual CD/DVD disks instead of having to insert physical disks. This saves tons of time and trouble. Even better, creating a shared ISO library and all of your Virtualization servers can share that installation media. Let's find out how to mount these virtual CD/DVD drives in VMware.
What is an .iso file?
An .iso file is a disk image of a ISO 9660 file. In other words, a disk image is a single file that contains everything on an optical disk. It is easy to create these ISO files from your existing optical CD/DVD disks and even easier to mount them in your operating system.
What are the benefits to using .iso files?
No CD/DVD media to storage, search or get scratched
Quick access to optical media because you don't spend as much time searching for it as you might your optical media
Higher performance reading of your optical media - reduce the time to install your operating system & applications Share media between people (assuming everyone has a license, of course)
Excellent for remote access - when the server is in the data center and, well, you "aren't" You can download them over the Internet, many times
ISO files can be created with a number of different programs. Usually, these are the same applications you use to burn CD/DVD disks. A list of ISO creators can be found here- Wikipedia.org - ISO Image
Once I create my ISO images, I prefer to mount them to the local Host OS using the Daemon Tools. With Daemon Tools, you can generate a number of virtual CD/DVD drives, then mount your virtual media (your ISO files). These ISO files appear just as if you had inserted a CD/DVD into your computer. However, VMware Workstation and Server have this feature built-in and you don't need ISO mounting tools like these.
How do you use ISO Image files with VMware?
All versions of VMware (Workstation, Server and ESX) offer the ability to mount ISO files and use them in virtual machines. Usually, these ISO files are used to install the operating system.
Recently, I had a new VMware user ask me how to mount ISO files inside VMware Workstation or Server. If you haven't done it before, it might not be obvious. On the other hand, once you do it, you will never need to be shown again. It is that simple.
To mount an ISO file in VMware Workstation or Server, go to your existing Virtual Machine. Double-click on the CD-ROM drive like this:
Or, inside VMware, go to VM -> Settings and click on CD/DVD drive. Here, you will seen the "Connection" properties for this device. By default, you are probably using the "physical driver". To change that and use a disk image, click on Use ISO Image, like this:
Click Browse, browse to the name of your .ISO file, and click Open.
This will fill in the path to your ISO file, like this:
Now, click Connect at power on and OK.
At this point the ISO is ready for use by the OS. This demonstration was done with the VM not running but this operation can be performed on VMs while they are running (just like you would taking a CD/DVD in and out of the CD/DVD drive on your PC).
Here, you can see that the mounting was successful:
As you can see, this Windows Server has a CD drive mounted, even though it has no physical CD/DVD drive. From here, I could install operating system upgrades or additional features.
Summary
ISO files have so many different uses. We just covered how they can assist with VMware virtual Workstation & Servers. These applications support ISO files out of the box but have to be told the path to the ISO file. Creating an ISO library and using that as your central ISO repository will save you and your group time and time again.

 Download SpyHunter* Spyware Detection Utility
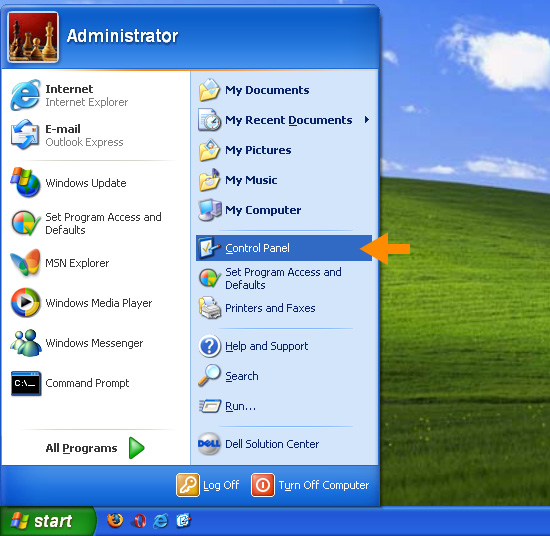


 Back to the top


