- Phone Support
Home → Email → Printer Friendly Version
- 1. Usermin Email
- 2. Exchange Server
- 3. Microsoft Outlook
- 4. Email Issues
- 5. Email Configuration
- 6. Email Utilities
- 7. Mobile Devices
1. Usermin Email
1.1. Add email to Allow or Deny List
The RJR Email system (specifically, Usermin), had the ability to mark email as Always Allow or Always Deny. Since the system scores email based on sender, content, subject, attachments and additional characteristics and if it scores high enough, it is placed in your spam folder. In some cases (not often), legitimate email may qualify based on what the sender composed or forwarded. Email that scores very high (and matches the blacklist servers) are just discarded. In turn, spam will also get through since we are balancing the need to block spam, but allow legitimate email through. Spammers are very clever and will disguise their spam to look like legitimate email.
There is a way that you can whitelist (Always Allow) an email address for your individual account. Remember, this bypasses the anti-spam system, so the email will also come through. We have some of our clients do this for emails originating from overseas that are vendors. Here are the steps:
- Log into your email account (RJRSolutions.com home page and click Usermin)
- Click on the Usermin link in the top left portion of your screen (above your name)
- Click on the Mail link on the left navigation to expand the selections
- Click on SpamAssassin Mail Filter
- In the main window, click on Allowed and Denied Addresses
- You will see a window with 4 tabs. This area allows you to add Allowed Addresses and Denied Addresses, as well as some other options.
- ALLOW EMAIL ADDRESS:
Make sure you are on the Allowed Addresses tab. Simply type the email address you want in the box next to Senders To Never Classify As Spam and then click Save at the bottom of the screen. - ALWAYS DENY EMAIL:
Make sure you are on the Denied Addresses tab. Simply type the email address you want to block in the box next to Senders to always classify as spam and then click Save at the bottom of the screen. - Once the main SpamAssasin Mail Filter window appears, click on Mail (top left corner) and then your Inbox.
Note: We maintain a server level list as well for blocking and aggressively keep it maintained to minimize spam traffic.
As you may have noticed, the Usermin area contains other functions and options. Please be careful if you are curious and want to see what else is available. Many of the other options in this area are also available in the main Mail area of the email system. If you do have any questions, please either call our office for help or send an email to Helpdesk@rjrsolutions.com with your name, email and question.
2. Exchange Server
2.1. Reset BES Synching on Blackberry
This process is to be used if the client is not receiving emails on his Blackberry AND there is not problem noted in the Status window for the BES.
On the BlackBerry, go to Options>Advanced Options>Service Books> and then delete the "Desktop Sync" and the "CMIME" then wait 30 seconds and then Un-delete them then let the device re sync.
2.2. Syncronizing Blackberry and Exchange
The BB does sync Email, contacts and Calendars with BES.
You need to go here and check the settings to make sure the BB and Outlook are on the same "page"
To just check the settings use Steps 1-8
Only use Steps 9-11 if you're having a problem,
1. From your homescreen, go into your Messages folder.
2. Once in your messages, folder, bring up your menu
3. Scroll down to and choose "Options".
4. Scroll down to and select "Email Reconciliation".
5. In the "Email Reconciliation" menu, make sure "Delete On" is set to "Mailbox & Handheld".
6. Confirm that Wireless Reconcile is set to "On"
7. Confirm that "On Conflicts" your "Mailbox Wins"
8. Save your changes.
9. Exit back out to your messages folder, and once again bring up the menu.
10. Scroll down to "Reconcile Now" to force a reconciliation between your handheld and In-Box.
11. Your messages should now synchronize between your BlackBerry and In-Box.
2.3. Folder Redirection for Blackberry
To set folder redirection on the handheld, the BlackBerry Handheld Software must be version 4.0 or higher.
1. From the Home screen on the handheld, go to Messages.
2. Click the trackwheel and select Options > Email Settings.
3. Click the trackwheel and select Folder Redirection.
4. In the Folder Redirection menu, expand the Mailbox by highlighting it, clicking trackwheel and selecting Expand.
5. Under the Mailbox, expand the Inbox by highlighting it, clicking the trackwheel and selecting Expand.
6. Highlight the folder you want to enable redirection on. Click the trackwheel and select Change Option.
Note: If you are unable to select Expand for any of the folders, or if the Change Option menu option is unavailable, try turning Wireless Reconcile on the handheld off and then on again. You can find Wireless Reconcile in Messages > Options > Email Reconciliation.
7. Click the trackwheel and select Save to save your changes
3. Microsoft Outlook
3.1. Outlook blocked access to the following potentially unsafe attachments
http://www.annoyances.org/exec/show/article08-104
By default, Microsoft Outlook (part of Microsoft Office) won't allow you send or receive certain types of attachments; instead, you'll just get this message:
Outlook blocked access to the following potentially unsafe attachments: yourfile.mdb
The rationale is that these documents can contain viruses or other harmful code, but the fact that Outlook doesn't let you disable or at least customize this feature is just plain stupid. Here's how to do it:
- Close Outlook.
- Open the Registry Editor.
- If you using Office XP/2002, expand the branches to HKEY_CURRENT_USER\ Software\ Microsoft\ Office\ 10.0\ Outlook\ Security
If you using Office 2003, expand the branches to HKEY_CURRENT_USER\ Software\ Microsoft\ Office\ 11.0\ Outlook\ Security
- Create a new string value by selecting New and then String Value from the Edit menu.
- Name the new value Level1Remove.
- Double-click the new Level1Remove to edit it, and enter the filename extensions you'd like to stop Outlook from blocking. Extensions should be typed in lower case, without the dots (.), and separated by semicolons (;). For example, type
- exe;mdb;vbs
- Click Ok and then close the Registry Editor when you're done.
- The next time you restart Outlook, you'll now be able to open previously-blocked attachments. (If an attachment is still blocked, you likely got the filename extension wrong.)
3.2. Forms Problems and Clearing the Cache
How the Outlook forms cache works
When a user opens an item, Outlook looks at the value of the item's MessageClass property to determine whether the item should be displayed with a standard form, a custom form, or (beginning in Outlook 2007), a form region. If the item requires a published custom form, Outlook stores a copy of the form on your local hard disk. The next time you need to use the form, Outlook checks this forms cache. If the form is in the cache, Outlook goes to the form's original location to check the form's Modified timestamp. If a user has modified the form since Outlook cached it, Outlook opens the form from its original location and updates the cache with the modified version. If no one has modified the form since Outlook cached it, Outlook loads the form from the cache, which is usually much faster than opening it from the original location.
If the required form isn't in the cache, Outlook looks in other locations, in this order:
- The forms library for the currently displayed folder
- Personal Forms library - in the user's default information store
- Organization Forms library - on the Exchange server
The location of the forms cache depends on the operating system, where %username% is the environment variable containing the user's login name:
- Windows Vista - C:\Users\%username%\AppData\Local\Microsoft\FORMS
- Windows XP - C:\Documents and Settings\%username\Local Settings\Application Data\Microsoft\FORMS
The cache contains a Frmcache.dat file, which maintains a summary of cached forms and pointers to the cached files, plus a subfolder for each cached form.
Error Messages
Error messages such as
- The form required to view this message cannot be displayed
- Can't create item
often signal corruption related to a custom form—either in the form itself or in the data file on the client that stores forms cache information. Exactly what causes forms cache corruption is not known.
If corruption occurs frequently and clearing the forms cache (see below) does not solve the problem, you can use the ForceFormReload registry entry to force Outlook to reload a form from the original published version when Outlook can't load the form from the cache.
Clearing the Forms Cache
The first step in troubleshooting is to use the command in Outlook to clear the cache using the Manage Forms dialog (Tools | Options | Other | Advanced Options | Custom Forms, then click Manage Forms).
If that does not resolve the problem, shut down Outlook and delete the entire contents of the FORMS folder (for locations, see above).
Notes
The order Outlook uses to look for a form explains a common problem. Suppose a user publishes a new form in the Personal Forms library. Later, the user makes changes to the form and publishes the revised form under the same name but in a different library—Organization Forms. When the user opens an item that uses the custom form for the first time, Outlook loads the version in the Personal Forms Library because Outlook checks that location first, but that version won't include the revisions on the version the user saved in the Organization Forms Library.
The stumbling block is the copy in the Personal Forms library. The solution is to delete that copy by using the Manage Forms dialog (Tools | Options | Other | Advanced Options | Custom Forms, then click Manage Forms). After you delete that copy, the Organization Forms copy usually loads fine. If it doesn't, make sure that you're incrementing the version number on the form's (Properties) page. You can also try using the form to create a new item. When opening a previously created item doesn't load the updated form into the cache, creating a new item sometimes does the job.
If above is unsuccessful, KB836558:
3.3. "The address list could not be displayed" error message when you use your Contacts to address a new message in Outlook
SYMPTOMS
If you attempt to address a new message from your Contacts, you may receive the...
 Back to the top
CAUSE
This behavior can occur if the Microsoft Outlook Address Book is damaged....
RESOLUTION
To resolve this issue, remove and reinstall the Outlook Address Book. To do this...
- Start Outlook.
- On the Tools menu, click E-mail Accounts.
- Click View or change existing directories or address books, and then click Next.
- Click Outlook Address Book, and then click Remove.
- Click Yes when you receive the prompt to confirm the removal.
- Click Add.
- Click Additional Address Books, and then click Next.
- Click Outlook Address Book, and then click Next.
- Click OK when you receive the message to restart Outlook.
- Click Finish.
- Click Exit on the File menu to quit Outlook.
- Restart Outlook.
- In the Folder list, right-click the folder that you want to use with the Address Book (for example, right-click Contacts), and then click Properties.
- Click the Outlook Address Book tab.
- Click to select the Show this folder as an e-mail Address Book check box (if it is not already selected), and then click OK.
MORE INFORMATION
For additional information about how to troubleshoot the Address Book in Outlook...
APPLIES TO
- Microsoft Office Outlook 2003
- Microsoft Outlook 2002 Standard Edition
4. Email Issues
4.1. How To Display Full E-mail Header Information
How To Display Full E-mail Header Information
Have you ever received an e-mail from someone you know, but the subject looks suspicious or have you received an e-mail from someone you know didn't send it? There is a way to determine the origin of the e-mail.
To do this you need the full header information. The header is the section of code that contains where the e-mail came from how it reached you. The header information will provide the originating IP address and/or the computer the originator was using. Given an IP address and a time stamp, most providers or sites can find the end user who was using the IP address at the specific time.
If you follow the instructions on extracting headers you should be able to identify the origin from various e-mail clients and programs.
Outlook for Windows: Outlook 98, 2000, 2002, and 2003
Method 1:
- Open the mail message.
- Select View from the menu options and then select Options from the drop-down menu box.
- The message headers are at the bottom of the window, in a box labeled "Internet Headers:"
Method 2:
- Options from the menu box.
- The message headers are at the bottom of the window, in a box labeled "Internet Headers"
Outlook for Windows: Outlook 2007
Method 1:
- Open the mail message.
- Click on the small arrow located in the bottom right corner of the Options field, which is located on the Quick Access Toolbar.
- The message headers are at the bottom of the window, in a box labeled "Internet Headers:"
Method 2:
- Message Options from the menu box.
- The message headers are at the bottom of the window, in a box labeled "Internet Headers"
Outlook 2001 for Mac OS
- Open the mail message in a separate window
- File menu, select Properties….
- In the window that appears, click the Headers tab. The headers will appear in the box labeled "Headers for this message.".
Microsoft Exchange (prior to Outlook)
- Open the mail folder containing the mail message.
- Right-click the mail message for which you want the headers, and select Properties.
- Click the Headers tab to read the full headers.
Outlook Express for Windows:
- Right-click the message, then select Properties. (If you have the message open, from the File menu, select Properties.)
- Click the Details tab. This will display the full headers of the message.
Entourage 2004 or Outlook Express for Mac OS
In the main Entourage window, open the e-mail you wish to view the header information in a new window.
- Select View from the menu options and then select Internet Headers from the menu box.
- A dialog box will pop-up with the message headers.
Entourage 2008
In the main Entourage window, select the e-mail you wish to view the header information. You don't have open the message in a new window, but doing so will also work.
- Select Message from the menu options and then select Internet Headers from the menu box.
- A dialog box will pop-up with the message headers.
Here is an example:
Microsoft Mail Internet Headers Version 2.0
Received: from exmail01.bsu.edu ([10.192.24.33]) by EMAIL7.bsu.edu with Microsoft SMTPSVC(5.0.2195.5329);
Tue, 2 Mar 2004 02:43:55 -0500
Received: from ibmail01.bsu.edu ([10.192.24.35]) by exmail01.bsu.edu with Microsoft SMTPSVC(5.0.2195.6713);
Tue, 2 Mar 2004 02:43:54 -0500
Received: from p5224-ipad32funabasi.chiba.ocn.ne.jp ([221.189.137.224])
by ibmail01.bsu.edu (SAVSMTP 3.1.2.35) with SMTP id M2004030202434510609
; Tue, 02 Mar 2004 02:43:50 -0500
Received: from 124.192.108.71 by 221.189.137.224; Tue, 02 Mar 2004 10:43:44 +0300
Message-ID: BXHPFKQEIYYCGSKXQPKHAOCDI@yahoo.com
From: "Olga George" podpdpiezoflk@yahoo.com
Reply-To: "Olga George" podpdpiezoflk@yahoo.com
To: xyz (actual address has been changed)
Subject: Lower your monthly payments
Date: Tue, 02 Mar 2004 10:42:44 +0300
X-Mailer: Microsoft Outlook Express 5.50.4522.1220
MIME-Version: 1.0
Content-Type: multipart/alternative;
boundary="--42501322956449316"
X-Priority: 3
X-MSMail-Priority: Normal
Return-Path: podpdpiezoflk@yahoo.com
X-OriginalArrivalTime: 02 Mar 2004 07:43:54.0799 (UTC) FILETIME=[1CFA03F0:01C4002A]
----42501322956449316
Content-Type: text/html;
Content-Transfer-Encoding: quoted-printable
Usually the IP address that should be traced is close to the bottom of the stack, nearer to the actual body of the message. In this example it is 124.192.108.71. It should be noted that the source IP address will not resolve on the internet as it is within a block of IP addresses that are "reserved" private IP addresses. They are used behind corporate firewalls and proxy servers. They access the outside world through a Network Address Translation (NAT) service.
EXCERPT FROM: http://www.bsu.edu/security/article/0,1384,86674-5031-19683,00.html
4.2. Email backup for IMAP accounts
These instructions are for users who operate out of RJR webmail only, and need a backup solution. Anyone who uses Outlook or Outlook Express to access their email should continue to use those applications as their backup source.
How to Back Up IMAP Email Using IMAPSize
For those still needing the software, your Office Manager should be able to provide it to you, but it can also be downloaded from the developer's website: http://www.broobles.com/imapsize/download.php -- The program is free to download and use, though there is a donate button to show appreciation for the developer's hard work.
Click on the "Zipped Distribution" option under "Latest Release" to download a zip file. This version can be run on a flash memory disk, so you can carry your backups wherever you need, conveniently.
Unzip the file, and you will see a directory called "IMAPSize_###" (where the ### reflects the latest version number--currently 037). You can leave this directory on your desktop or laptop, or copy it to any sort of flash disk; the program will run and save your backup entirely inside that folder.
- Backing Up Your Email
Open the directory and double click on the "imapsize" program icon:
This will prompt a window asking if you want to add an account. Select "yes" and another window opens. Enter your name under "Account", your webmail login and password, and "mail.mycompany.com" (replacing with your company's appropriate email domain).
Select "OK" and and then "no" if it asks you to add another account. You should now notice the name of the account in the upper-left of the program window, and a button to perform an Account Backup.
This will find any folders that exist on your account. You can select them individually, but it is easiest to "Select All" and then "Backup"
You can watch the progress on the bottom bar. The process may take a while (half and hour or more) for particularly large folders. When it is finished, an Information window will open to let you know.
- Viewing Email After Backup
If you look inside your IMAPSize_### folder now, you will see a "backup" folder, and folders for any accounts you have backed up. The program saves all your email folders separately inside that, and each email is saved as a separate file. Attachments are also saved inside those files.
These files will attempt to open in Outlook Express (XP) or Windows Mail (Vista or Windows 7), and if you do not have an account set up in those programs, they will launch and ask you to create one. You can freely cancel out of the setup prompts, and your email will still open, allowing you to view the message or the attachments.
5. Email Configuration
5.1. Using Gmail with POP Email Accounts
Step 1 - Set up Gmail to pull from external account
- Log into GMail Account
- Click on Settings
- Click on Accounts and Imports
- Click on Add POP3 email account
- When prompted, enter the email address and click Next
- Enter the username, password and mail server info
Make sure to check the Label Incoming Messages and create a label - Click Add Account
- Continue to Next Step (Yes, I want to be able to send mail as xxxxxx@xxxxx.xxx)
- Follow prompts (enter your name and click Next Step)
- Send mail through your SMTP server? YES
This is a very important step. Make sure you select to send through your corporate email server) - Enter the SMTP server information
NOTE: When using RJR mail servers, make sure to use port 587 or 465 - Click Add Account when information is entered
- An email will be sent to your email account for this setup with a link and confirmation code. This must be entered into the Confirm verification and add your email address window to complete the process.
- An email will also be sent to your GMail account that needs to be confirmed. Make sure to read this as well.
Step 2 - Set up Gmail so it will reply with the same account as receiving
- Click on Settings (unless you are still on screen)
- Under When receiving a message: heading, click on Reply from the same address the message was sent to
- Also, when composing an email, it will automatically use the GMail email account as the default. You can change that on this screen as well. Otherwise, when creating an email, you can select which account to use.
At this point, you are all set.
5.2. SMTP Servers
The following is a listing of all known SMTP servers. They are also known as Outgoing Mail server settings. The list below represents the best knowledge of these systems. It is presented with no expressed guarantees that they will work. In other words, may the force be with you...
-Yoda
| 12 | 012.net.il |
| 191 | mail.191.biz |
| 191.it | mail.191.it |
| Access4Less | smtp.access4less.net |
| Active Network | smtp.activenetwork.it |
| Actrix Networks | mail.actrix.co.nz |
| Adelphia | mail.adelphia.net |
| akfree | smtp.akfree.it |
| Albacom | relay.albacom.net |
| Albacom | smtp.albacom.net |
| albacom | smpt.albacom.net |
| alcotek | smtp.alcotek.it |
| alice | out.aliceposta.it |
| aliceposta.it | mail.tin.it |
| alise | outmail.f2s.com |
| AOL | smtp.aol.com |
| Arnet | smtp.arnet.com.ar |
| Aruba | smtp.aruba.it |
| AT & T Wireless | smtp.attwireless.net |
| AT & T Worldnet | imailhost.worldnet.att.net |
| atlanet | smtp.atlavia.it |
| atlanet | smtp.weblinea.it |
| Auna | smtp.auna.com |
| Bahrain Telecommunications Company | batelco.com.bh |
| Barak I.T.C | mail.barak.net.il |
| basilicatanet.it | mail.basilicatanet.it |
| bella.ci | bella.ci |
| Bellsouth | mail.bellsouth.net |
| Bezeq International | mail.bezeqint.net |
| Bezeqint | mail.bezeqint.net |
| Bitstop | pangasinan.com |
| Blu.it | smtp.blu.it |
| Bluebottle | mail.bluebottle.com |
| bluelight.com | smtp.mybluelight.com |
| Bluewin | mail.bluewin.ch |
| BlueYonder | smtp.blueyonder.co.uk |
| bol.com.br | smtp.bol.com.br |
| BRTURBO | smtp.brturbo.com.br |
| BT Internet | mail.btinternet.com |
| BT Openworld | mail.btopenworld.com |
| BTClick | smtp.btclick.com |
| BTTB | mail.bttb.net.bd |
| BusinessServe | smtp.businessserve.co.uk |
| Cable One | mail.cableone.net |
| Cableinet | smtp.blueyonder.co.uk |
| Caiway | smtp.caiway.nl |
| Callsouth - Broadband | smtp2.callsouth.net.nz |
| Callsouth - Dial up | smtp.callsouth.net.nz |
| Cantv.net | mail.cantv.net |
| cegetel | smtp.cegetel.net |
| Chariot Netconnect | mail.vic.chariot.net.au |
| charter | pop.charter.net |
| Charter | mail.charter.net |
| cheapnet | smtp.cheapnet.it |
| chello.pl | mail.chello.pl |
| ciaoweb | ciaosmtp.ciaoweb.it |
| Cingular | smtp.mymmode.com |
| Ciudad | smtp.ciudad.com.ar |
| Claranet | relay.clara.net |
| Clear Net | smtp.clear.net.nz |
| click21 | smtp.click21.com.br |
| Club-Internet | smtp.club-internet.fr |
| collegeclub | collegeclub.com |
| Colt.net (Germany) | smtp.ipmail.colt.net |
| Columbia Power and Water | mail.cpws.net |
| Comcast | smtp.comcast.net |
| Cox - Central | smtp.central.cox.net |
| Cox - East | smtp.east.cox.net |
| Cox - West | smtp.west.cox.net |
| Cultura | smtp.cultura.com.br |
| CWCom | smtp.ntlworld.com |
| Datamat | mail.datamat.it |
| Demon | post.demon.co.uk |
| Digitel Italia | smtp.etmail.it |
| Dinajpur | www.dinajpur.biz |
| Dream Net Internet | mail.dreamnet.co.nz |
| Earth Link | smtpauth.earthlink.net |
| Easynet | smtp.easynet.co.uk |
| eircom.net | mail2.eircom.net |
| Elitel | smtp.elitel.biz |
| Email.it | smtp.email.it |
| Embarq | smtp.embarqmail.com |
| Euronet NL | smtp.euronet.nl |
| everybodycanadd | itsverybad |
| Excite | smtp.tiscali.it |
| EzySurf | smtp.ezysurf.co.nz |
| FastMail | mail.messagingengine.com |
| Fastweb | smtp.fastweb.it |
| fastweb | pop.fastwebnet.it |
| Fastweb | mailbus.fastweb.it |
| Fastweb | smtp.fastwebnet.it |
| fibertel.com.ar | smtp.fibertel.com.ar |
| Free | smtp.free.fr |
| Free Telecom | smtp.free.fr |
| Freedom2surf | outmail.f2s.com |
| Freemail | smtp.freemail.it |
| freemail.it | mail.freemail.it |
| freemail.it (supereva) | mail.freemail.it |
| freenet | mx.freenet.de |
| freenet.de | mx.freenet.de |
| Freeserve | smtp.freeserve.co.uk |
| Galactica.it | smtp.galactica.it |
| Genie | mail.genie.co.uk |
| GIGA | smtp.giga.net.tw |
| Globe Net Communications | smtp.globe.net.nz |
| gmail | smtp.gmail.com |
| GMX | mail.gmx.net |
| Go Daddy | smtpout.secureserver.net |
| go.com | smtp.go.com |
| Haier Electronics | smtp.haier-electronics.com |
| Hinet | msa.hinet.net |
| HiNet | ms1.hinet.net |
| hotmail | mx2.hotmail.com |
| HOTMAIL | hotmail.co.uk |
| Hotmail.com | mx1.hotmail.com |
| Hotmail.com | mx1.hotmail.com |
| Hotmail.com | mx2.hotmail.com |
| HotPOP.com | smtp.hotpop.com |
| I4U Internet Services | mail.i4u.net.nz |
| ic24 | smtp.ic24.net |
| IG | smtp.ig.com.br |
| IHUG | smtp.ihug.co.nz |
| INET | inet.it |
| Infinito | mail.infinito.it |
| InfoStructure -- GRR Technology | smtp.grrtech.com |
| InfoStructure -- InfoStructure | smtp.mind.net |
| InfoStructure -- Klamath Falls Internet | smtp.kfalls.net |
| InfoStructure -- Medford Internet | smtp.medford.net |
| InsightBB | mail.insightbb.com |
| Interbusiness (TI Easynet) | mail1.cs.interbusiness.it |
| INTERFREE | mail.interfree.it |
| Internet Zahav | sout.zahav.net.il |
| internetlibero | smtp.internetlibero.it |
| inWind | mail.inwind.it |
| IOL | mail.iol.it |
| Iomart | smtp.domain.ext |
| IPrimus Australia | smtp.iprimus.com.au |
| Iprolink | smtp.iprolink.co.nz |
| istruzione.it | istruzione.it |
| ItalyMAIL | mail.italymail.biz |
| ixpres.com | smtp.ixpres.com |
| jumpy | mail.jumpy.it |
| Juno | smtp.juno.com |
| Katamail | smtp.katamail.com |
| Kataweb | smtp.katamail.com |
| la poste | smtp.laposte.net |
| Le neuf | smtp.neuf.fr |
| Libero | mail.libero.it |
| Lillinet | smtp.weblinea.it |
| Lineone | smtp.lineone.net |
| Lycos | smtp.lycos.co.uk |
| lycos.it | smtp.lycos.it |
| Mac.com | smtp.mac.com |
| Madasafish | smtp.madasafish.com |
| mail.quizil.net | mail.quizil.net |
| mail.ru | smtp.mail.ru |
| Mailsnare | mail.mailsnare.net |
| Maktoob Mail | mira0.maktoob.com |
| McLink | mail.mclink.it |
| Mediacom | mail.mchsi.com |
| Mistral | smtp.mistral.co.uk |
| Momax | smtp.momax.it |
| ms15.hinet.net | ms15.hinet.net |
| msoft.it | smtp.weblinea.it |
| mtel | mail.mtel.net |
| NamesToday | smtp.namestoday.ws |
| NamesToday | smtp.namestoday.ws |
| nerim.net | astralblue@nerim.net |
| netcabo | smtp.netcabo.pt |
| Netexplora Chile | mail.netexplora.com |
| Netlink | mail.netlink.co.nz |
| netscape | smtp.isp.netscape.com |
| Netscapeonline | mailhost.netscapeonline.co.uk |
| netvigator | mail.netvigator.com |
| Netvisão (Portugal) | mail.netvisao.pt |
| Netvisão (Portugal) | mail.netvisao.pt |
| NetZero.com | smtp.netzero.com |
| neuf telecom | smtp.neuf.fr |
| NGI | smtp.ngi.it |
| Nildram | smtp.nildram.co.uk |
| Noos | smtp.noos.fr |
| novis (portugal) | mail.novis.pt |
| ntl (uk) | smtp.ntlworld.com |
| NTLWorld | smtp.ntlworld.com |
| OneTel | mail.onetel.net.uk |
| ono | wanadoo.fr |
| oNo | smtp.ono.com |
| Optonline (Cablevision's Optimum Online) | mail.optonline.net |
| Orcon | mail.orcon.net.nz |
| outgoing.verizon.net | tchrshelli |
| P.C.T.S. | ns.pcts.sk |
| Paradise Net | smtp.paradise.net.nz |
| PCHome | smtp.pchome.com.tw |
| Pipex | smtp.dsl.pipex.com |
| Pipex | smtp.dial.pipex.com |
| pixius | smtp.citilink.com |
| Post Man | mail.postman.net |
| Poste.it | relay.poste.it |
| postino.it | smtp.postino.it |
| Previdencia | kiwi.previdencia.gov.br |
| prodigy | xasa.com |
| Prodigy(TELMEX)(México) | smtp.prodigy.net.mx |
| promo.it | smtp.promo.it |
| Purplenet | smtp.purplenet.co.uk |
| Quipo | quipo.it |
| R (cable Galicia) | smtp.mundo-r.com |
| Radio Deejay Mail | smtp.deejaymail.it |
| RCP (PERU) | amauta.rcp.net.pe |
| Reteitaly | smtp.reteitaly.com |
| Rogers | smtp.broadband.rogers.com |
| RunBox | smtp.runbox.com |
| Sapo (Portugal) | mx.sapo.pt |
| SBC Global (Yahoo Powered) | smtp.wans.yahoo.com |
| SBC Global (Yahoo Powered) | smtp.swbell.yahoo.com |
| SBC Global (Yahoo Powered) | smtp.ameritech.yahoo.com |
| SBC Global (Yahoo Powered) | smtp.flash.yahoo.com |
| SBC Global (Yahoo Powered) | smtp.nvbell.yahoo.com |
| SBC Global (Yahoo Powered) | smtp.pacbell.yahoo.com |
| SBC Global (Yahoo Powered) | smtp.prodigy.yahoo.com |
| SBC Global (Yahoo Powered) | smtp.sbcglobal.yahoo.com |
| SBC Global (Yahoo Powered) | smtp.snet.yahoo.com |
| SBC Yahoo DSL | smtp.sbcglobal.yahoo.com |
| sbcyahoo.dsl | smtp.sbcglobal.yahoo.com |
| Scarlet or Scarlet.be | smtp.scarlet.be |
| Screaming.Net | smtp.tiscali.co.uk |
| SFR (French mobile telephone) | smtp-auth.sfr.fr |
| Shylex Telecomunicaciones | smtp.shylex.net |
| SiFree.it | smtp.simail.it |
| sify.com | mail.satyam.net.in |
| skynet | relay.skynet.be |
| Skynet.be | relay.skynet.be |
| Slingshot | smtp.slingshot.co.nz |
| softhome.net | mail.softhome.net |
| SouthNet | smtp.southnet.co.nz |
| Southwestern Bell | mail.swbell.net |
| SprintPCS | smtp.sprintpcs.com |
| Spymac | mail.spymac.com |
| StofaNet.dk | mail1.stofanet.dk |
| sunrise (CH) | smtp.sunrise.ch |
| Supanet | smtp.supanet.com |
| supereva | mail.supereva.it |
| SuperFree.it | smtp.superfree.it |
| sympatico | smtp1.sympatico.ca |
| Tag Comunicazioni | 64.94.0.31 |
| Tariffe.it | smtp.tariffenet.it |
| TDC | backup-mx.post.tele.dk |
| tele2.fr | smtp.tele2.fr |
| tele2.it | smtp.tele2.it |
| Tele2Internet | virtual.everyday.com |
| telecom | mail.cs.interbusiness.it |
| Telecom (Alice) | mail.tin.it |
| Telecom ADSL (Business) | smtp.191.it |
| Telecom ADSL (Business) | mail.191.it |
| telecom italia | 191.it |
| Telecom Smart | mail.tuttopmi.it |
| Telecom Xtra | smtp.xtra.co.nz |
| Teleconomy Internet | mail.191.it |
| TELEDISNET.BE | mail.teledisnet.be |
| telefonica | smtp.telefonica.net |
| Telenet (belgium) | uit.telenet.be |
| telenet(belgium) | uit.telenet.be |
| telepac | smtp.telepac.pt |
| Telepac ADSL (Portugal) | smtp.telepac.pt |
| telewest | smtp.blueyonder.co.uk |
| Telewest | smtp.blueyonder.co.uk |
| telkom | smpt.telkom.net |
| Telkomsa.net | smtp.telkomsa.net |
| Telus | smtp.telus.net |
| Telus.net | mail.telus.net |
| Telvia.it | smtp.telvia.it |
| Terra | smtp.terra.es |
| Terra - BR | smtp.sao.terra.com.br |
| Terra - BR - Recife | smtp.rec.terra.com.br |
| Terra - España | smtp.mailhost.terra.es |
| Terra - España | mailhost..terra.es |
| Terra - España | smtp.mailhost.terra.es |
| Tesconet | mail.tesco.net |
| TIM.it | mail.posta.tim.it |
| timenet ADSL | smtp2.xdslnet.it |
| Tin.it | out.virgilio.it |
| TIN.IT free (funziona con Alice) | mail.clubnet.tin.it |
| Tiscali | smtp.tiscali.it |
| Tiscali | smtp.tiscali.co.uk |
| Tiscali.de | smtp.tiscali.de |
| tiscali.es | smtp.tiscali.es |
| Tiscali.nl | smtp.tiscali.nl |
| Tnet | mail.tnet.it |
| t-online | mailto.t-online.de |
| Totalise | mail.totalise.co.uk |
| tre | smtp.tre.it |
| Tugamail | mail.tugamail.com |
| TuttoGratis.it | smtp.eutelia.it |
| Tvtel | tvtel.pt |
| UKGateway | smtp.ukgateway.net |
| unitedemailsystems | smtp.unitedemailsystems.com |
| unitedemailsystems | unitedemailsystems.com |
| UOL | smtp.uol.com.br |
| UOL Sinectis Argentina | relay.uolsinectis.com.ar |
| USA.net | smtp.postoffice.net |
| utenti interbusiness telecom | mail.cs.interbusiness.it |
| Utopia Systems | smtp.utopiasystems.net |
| utu.fi | smtp.utu.fi |
| V 21 | smtp.v21.co.uk |
| Verizon DSL | outgoing.verizon.net |
| videobank | videobank.it |
| virgilio | out.virgilio.it |
| Virgin | smtp.virgin.net |
| Vispa | mail.vispa.com |
| Vivacity | pop.Vivacity.it |
| Vodafone.it | smtpmail.vodafone.it |
| Waitrose | smtpmail.waitrose.com |
| wanadoo | smtp.wanadooadsl.net |
| wanadoo (France) | smtp.wanadoo.fr |
| wanadoo España | smtp.wanadoo.es |
| wanadoo.nl | smtp.wanadoo.nl |
| Web.de | smtp.web.de |
| Webmail.is | smtp.emailsrvr.com |
| Which Online | mail.which.net |
| wooow.it | smtp.wooow.it |
| World-Net | mail.world-net.co.nz |
| Worldonline | smtp.tiscali.co.uk |
| www.gmail.com | smtp.gmail.com |
| www.qos.net.il | mail.qos.net.il |
| www.tol.it | smtp-tol.it |
| www.tol.it | smtp.tol.it |
| X-Privat | mail.x-privat.org |
| XS4ALL | smtp.xs4all.nl |
| xs4all.nl | mail.xs4all.nl |
| Xtra | smtp.xtra.co.nz |
| Ya.com | smtp.ya.com |
| Ya.com ADSL | smtp2.adsl.ya.com |
| yahoo | yahoo.es |
| yahoo | smtp.mail.yahoo.com.cn |
| Yahoo | smtp.mail.yahoo.com |
| Yahoo (autentication needed) | smtp.mail.yahoo.com |
| Yahoo Argentina | smtp.mail.yahoo.com.ar |
| yahoo.co.uk | smtp.mail.yahoo.co.uk |
| yahoo.com.tw | stmp.mail.yahoo.com |
| yahoo.com.tw | smtp.mail.yahoo.com.tw |
| Yahoo.de | smtp.mail.yahoo.de |
| yahoo.es | smtp.correo.yahoo.es |
| yahoo.it | smtp.mail.yahoo.it |
| ZeelandNet | mail.zeelandnet.nl |
| zero.ad.jp | zero.ad.jp |
| Zonnet | smtp.zonnet.nl |
6. Email Utilities
6.1. Outlook Express Backup
Email backup is a very important task. Unfortunately, very few people think about it until they lose all their email in a computer or hard drive crash.
There are a number of utilities on the market to perform this task. Here are some that we have found to work well.
Please use the following software at your own risk. RJR Solutions did not develop, nor do we support any of these packages. If you require professional backup
solutions, please contact our office or submit a support request.
7. Mobile Devices
7.1. Set up wireless ActiveSync
Setup Wireless ActiveSync for PocketPC/SmartPhone |
|
|||||||
7.2. Email Setup for the Palm Centro and Exchange
Email setup for the Palm Centro (Verizon) smartphone
Article ID: 29303
NOTE: Make sure to download to correct version of VersaMail. The Personal Edition DOES NOT INCLUDE Outlook connectivity.
| Your Palm Centro includes two email applications:
You can also access web-based email, like Hotmail, or Yahoo! Mail from the web browser on your device. |
 |
What is VersaMail?
VersaMail is Palm's own email application. You can use VersaMail to manage a personal POP3 account such as Gmail, Yahoo! Mail Plus or Comcast, or an IMAP account such as AOL. VersaMail also lets Outlook users sync with the Exchange server (Exchange ActiveSync).
VersaMail lets you access up to eight email accounts - personal or corporate. You can view attachments through the Documents application on your device, and pick email address from your corporate Global Address List (GAL). VersaMail also offers real-time push synchronization of email and personal information; as messages are received on the server, they are automatically downloaded to your device.
What kind of email account do you want to set up in VersaMail or the Web browser?
| POP3 or IMAP personal email |
Exchange ActiveSync corporate email (Outlook) |
Web-based email such as Hotmail or Yahoo! |
||
 |
|
|
||
COMPLETE SETUP INSTRUCTIONS FOR EXCHANGE AND VERSAMAIL
Set up the account in VersaMail
Go to Applications  and select Email to open the VersaMail application. and select Email to open the VersaMail application.
|
 |
|
|
 |
|
| Enter the account username and password:
|

|
|
| Select Outlook (EAS) from the Mail Type drop-down menu. |  |
|
|
Enter your Exchange Mail Server name.
Then select one of the following:
|

|
|
|
Optional: If you selected Advanced ...
Select any of the following:
|
 |
|
|
Optional: If you selected Advanced ...
If you use a proxy server, enter the proxy server name and port number, and check the box if your server requires authentication. Check with your system administrator for this information. When you have finished, select Done. |
 |
|


What is push?
Push is a feature provided by Microsoft Exchange ActiveSync that pushes email messages, Calendar events, meeting invitations, and updated contact information it receives onto your smartphone. Likewise, when you create an email message or event or you update a contact on your smartphone, it is pushed to the server.
In addition, when you delete or change an email message (for example, mark a message read or unread) in one location, the change is pushed to the other location.
How does push work?
When you set up an Exchange ActiveSync account, push email, calendar, and contact information begins automatically as long as your server supports push and has push turned on.
Push from server to smartphone happens automatically as new or changed items arrive on the server. If items are created or changed on the smartphone, the items are pushed from smartphone to server at the following times:
- When a server-to-smartphone push takes place.
- When you select Sync in your Exchange ActiveSync account to manually retrieve information.
- At a preset time interval, if neither of the preceding two events takes place during that interval—for example, if neither a server push nor a manual sync takes place for 10 minutes.
If your server does not support push or does not have push turned on, push does not take place. Also note, for the option “As items arrive” to appear on your smartphone, EAS Direct Push must be enabled on the server.
- Go to the account in VersaMail
- Press Menu, select Options, and then select Preferences.
- Select Alerts, and then uncheck the box for "Alert me of new mail."
Change your Auto Sync options
You can choose how often you wish to retrieve email. To save battery life, you can set your device to sync less frequently.
- Open VersaMail and go to your Exchange ActiveSync account.
- Press Menu
 .
. - Select Options, and then select Preferences.
- Select Auto Sync.
- Check or uncheck the box for Auto Sync: Mail. If you do not select an Mail, it will not be synchronized on the Auto Sync schedule. Instead, you'll need to sync the item from within that application on your smartphone (it's an option in the Record menu for the application).
- Select an options for When. If you set a more frequent interval, you may need to recharge your device’s battery more often.
- Select OK, then select OK again.
7.3. Motorola Droid
- From the home screen, touch the applications tab (located on the bottom of the screen).
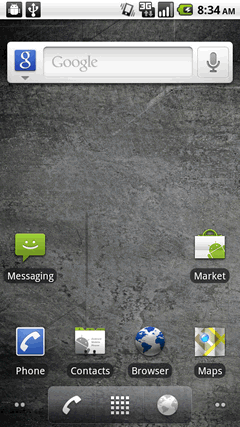
- Touch Email.
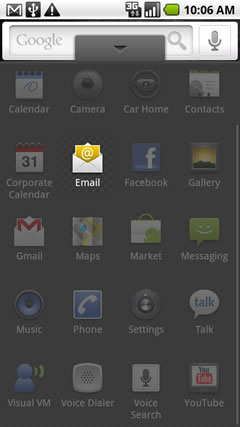
First email account added
Addtional email account added
First email account added
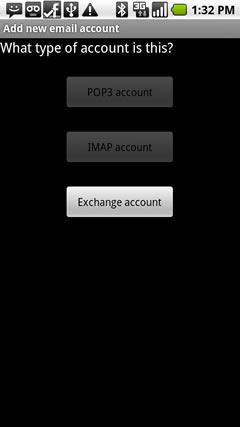
- Enter the exchange email address and password then touch Next.

- Touch Exchange account.
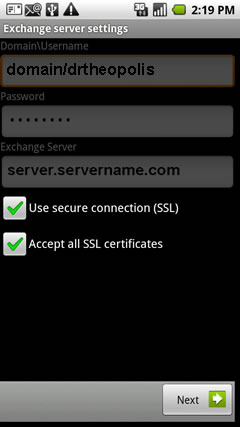
- Enter the exchange server settings in the appropriate fields:
- domain\username
- password
- Exchange Server
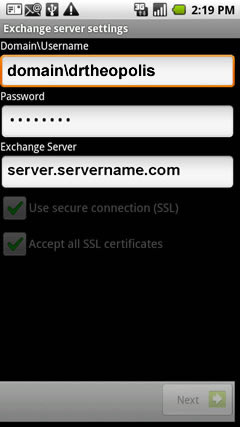
- If desired, ensure Use secure connection (SSL) and Accept all SSL certificates are checked then click Next.
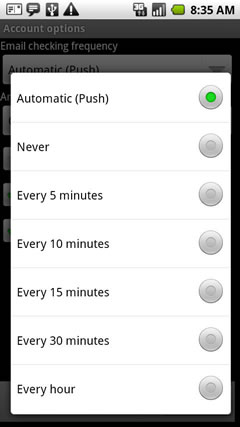
- Touch the Email Checking frequency dropdown.
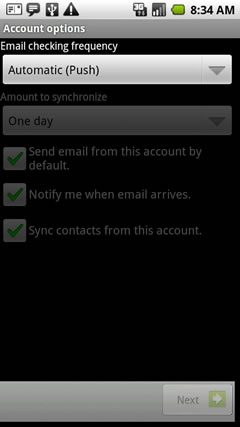
- Touch the desired frequency.
- Touch the Amount to synchronize dropdown.
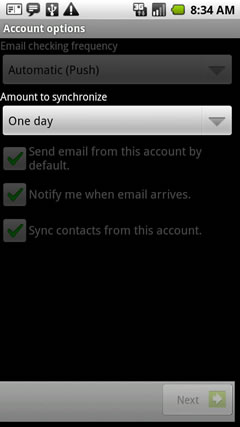
- Touch the desired amount.

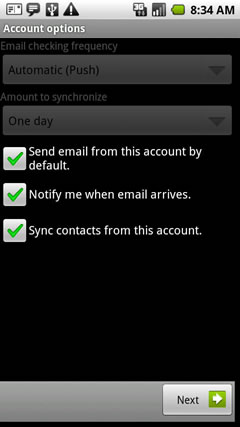
- Touch the desired account options then touch Next.
 The account option is enabled if a green check mark is present.
- Send email from this account by default.
- Notify me when email arrives.
- Sync contacts from this account.
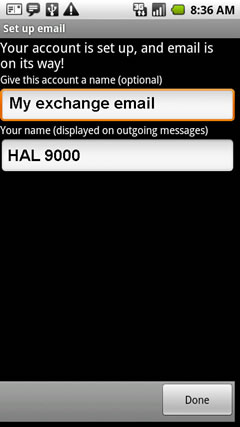
- Enter an account name and outgoing message name then touch Done.
Top
Addtional Email account added
- Touch Menu.
- Touch Accounts.
- Touch Menu.
- Touch Add account.

- Enter the exchange email address and password then touch Next.
- Touch Exchange account.
- Enter the exchange server settings in the appropriate fields.
- domain\username
- password
- Exchange Server
- If desired, ensure Use secure connection (SSL) and Accept all SSL certificates are checked then click Next.
- Touch the Email Checking frequency dropdown.
- Touch the desired frequency.
- Touch the Amount to synchronize dropdown.
- Touch the desired amount.
- Touch the desired account options then touch Next. The account option is enabled if a green check mark is present.
- Send email from this account by default.
- Notify me when email arrives.
- Sync contacts from this account.
- Enter an account name and outgoing message name then touch Done.